There are many free tools for desktop screen recording. Did you know, VLC Media Player is also perfectly capable of recording our screen, without any third-party apps.
VLC is the most popular Open Source media player which is well-known for its wide range of features and compatibility to various media formats. Almost every Windows user uses VLC player as the default media player.
But only a handful of people are aware that VLC can even record the desktop without the need of additional software. Yes! you heard it right.
You can record your desktop screen in the desired media format with the required frame rate. We accept that there are many software available. But you must remember that VLC is absolutely free and you don’t need to install any other software in your PC just for recording screen occasionally. So, Let’s do a screen recording with VLC media player.
Download & Install VLC Media Player
We know you already installed VLC media player. But if you don’t have, you can download latest version of VLC From https://www.videolan.org/
How to Record Desktop Screen With VLC
Follow the steps to record desktop screen.
- Open VLC Player in your PC.
- In VLC player, open Media settings and then select “Stream“.
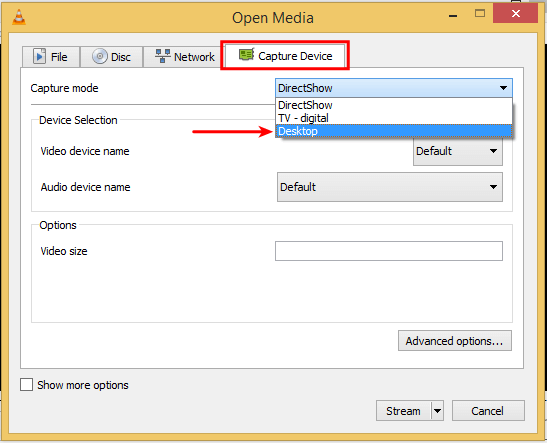
- A dialog box will open There, we select the “Capture Device” tab, and select “Desktop” as our capture mode.

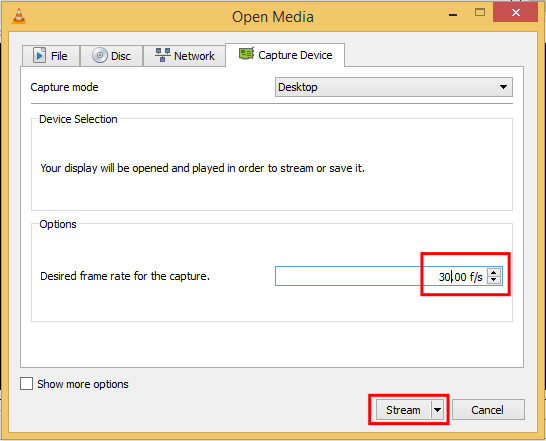
- After selection of “Desktop” as capture mode reveal some new options. change the desired frame rate for the capture from the useless 1 frame per second to a reasonable number. Like 20-30 f/s. Then Click on Stream.

- A stream output wizard will open to mention the source. You can leave it intact, so hit Next.
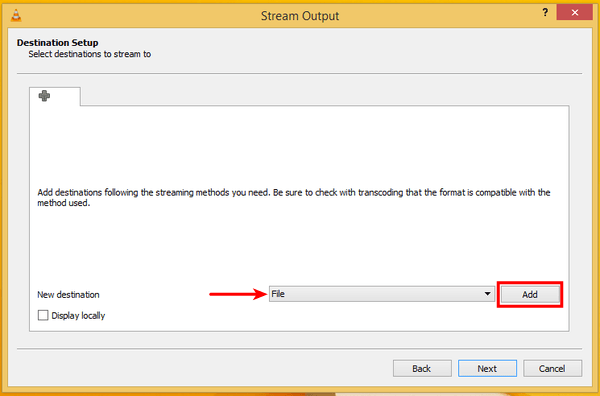
- Now in “New destination” make sure “File” is selected and then click on Add.

- Browse to the location where you want to save your output file and enter the file name completely with extension (Eg. video.mp4).
- Now Next, Under the profile choose the video format, The default MP4 is good enough, but you can select multiple other options. Then click on next button.
- Now click on the Stream button to start the recording. Minimize the VLC player and continue with your work.
- Once you are done with the recording click on the Stop button in the VLC player to stop recording.
- That’s it.
Pros of VLC screen recording
- The biggest advantage of VLC as a screen recording solution is that it works on every platform VLC is available on, on Windows, Mac, and Linux.
- Also, since for many of us VLC is the default media player, or at least we have it installed, we don’t need any extra software to do a screen recording.
Cons of VLC screen recording
- VLC won’t record sound, just picture.
- It will record the complete desktop, we can’t select just part of it, or change the recording’s resolution.
- There is no indication of how long we have recorded, or any indication that we are recording the screen, for that matter.
- We can’t pause the recording, we must just stop it altogether.
- There is no limit but the limit of the disk’s capacity.
- And, last but not least, VLC doesn’t offer any editing whatsoever, not even basic cuts. We need to use additional software for that.

Cool, I never thought that VLC could have such useful function. I will try it later. Aside from using VLC, I’d also recommend Acethinker Online Screen Recorder which I have been using for many years. It is a free web-based tool that lets you record your screen right from your browser. You don’t have to install any additional plug-ins or add-ons.