You are a website / blog owner, then you must need to setup google webmasters account. Google Webmasters tool help you to index your website/blog properly. You can easily track website performance with webmasters tool.
According to Matt Cutts (head of Google’s Webspam team) – “one of the five most common mistakes website owners make is to not use all the free webmaster resources available online. If that’s true, then what better topic could we choose for getting back to basics than how to set up webmaster tools! “
Google Webmasters is a free online tool that helps you manage the technical side of your website. The tools are indispensable for SEOs, especially since the various diagnostic reports give straight-from-the-horse’s-mouth insight on everything from broken pages to link penalties.
If you Want to know why your pages can’t be found in google search? Google Webmasters help you to give answers. It’s also Google’s hotline to communicate with website owners. So if any issues or penalties occur with your site, those crucial messages will come to you through Google Webmaster Tools.
How to Setup Google Webmasters
- First you need to login to your google account. If you don’t have then create a new one from here.
- After Login to Google account. Go to https://www.google.com/webmasters/ and Sign in to Webmasters.
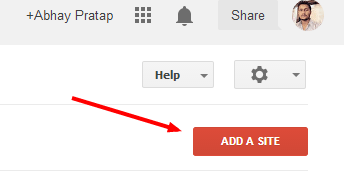
- Now click on Add a Site.

- A new Popup will appear. Here enter your website URL and click on continue.
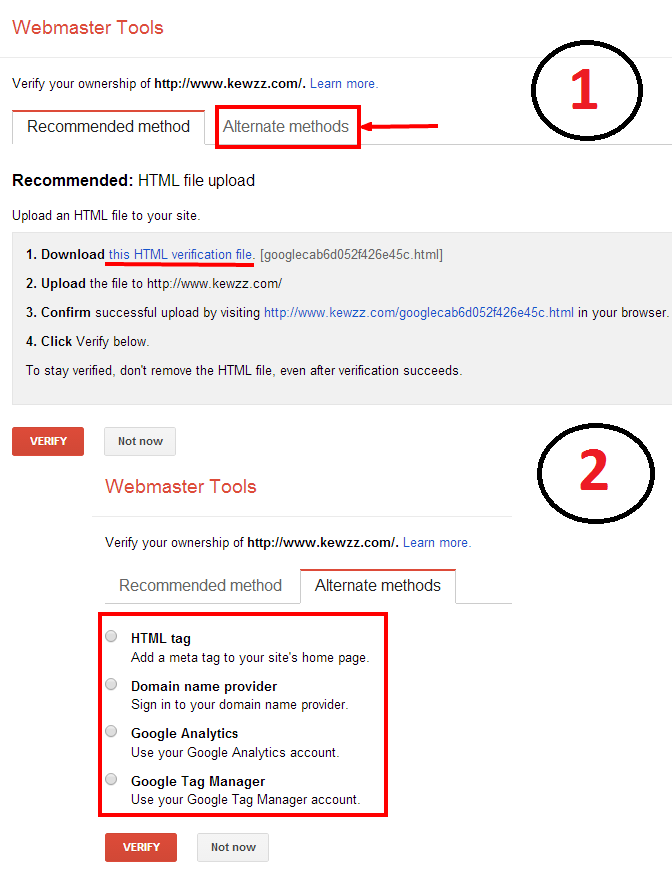
- Next, you have to verify that you are the site owner. There are several ways to do this. In 1st recommended method you have to download Google Verification File and upload it to your server under your domain files. And for more Click the “Alternate methods” tab to see them all.

- In Alternate method you see four methods available to verify website ownership.
- In HTML tag, you have to add meta tag to your site home page. Copy Site Verification Code and open website homepage in editor then paste the Meta tag into the <head> section, and save your changes. For wordpress users, there are many plugins available to this. If you are using WordPress seo by yoast, then go to plugin page and add Site Verification Code in google webmasters tool option. After Saving, click the Verify button to finish your Google Webmaster Tools setup.
- In 2nd By Domain name Provider. In this method Drop down the list and select the company where you registered the domain. If you purchased domain from godaddy then select godaddy and Follow the instructions given. Then click the Verify button to finish verification.
- In 3rd, By using Google Analytics. This method works,if you already setup Google Analytics account and added analytics code in your site. If you DON’T have Google Analytics set up, Choose other methods or First setup google analytics account.
- The fourth method is for people who have a Google Tag Manager account and “manage” permission.
Note: I recommend you to use HTML tag or Google Analytics method to verify website ownership.
Once you complete setup your Google webmasters account and verified your website ownership, then you are ready to use features of Google Webmasters.
Note: You may have to wait for few days, for data to be available. You can speedup process by submitting sitemap to the search engine for easy indexing.)
Watch Video Guides
>>>For Verifying Website Ownership
>>>For Submitting Sitemap
Hope this Google Webmaster Guide will help you to Verify Website with Google. If you have any problem in Google Ownership Verification, please submit your comment.
